Anywho, back to the sourdough, Hopefully your starter has been bubbling away and you have been feeding it regularity to keep it alive. I usually leave mine in the fridge during the week and bring it out in the weekend for making by weekly batch of bread. This system seems to work well for me, and I am yet to kill a starter.
Making a lough of bread has a few different steps: making the sponge, mixing the dough, rising the dough, and shaping and baking the dough. Let's start at the beginning:
1. Make the sponge
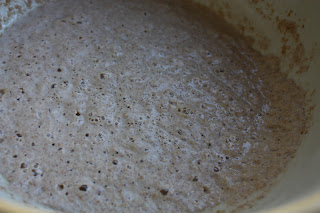
Before you make a loaf, you need to get your yeasts/starter in optimum condition - this is called the sponge. To make this, I tip my starter into a big ceramic bowl, mix in 100 grams of flour and enough tepid water to make a thick batter, cover with gladwrap, pop in a warm place (e.g hotwater cupboard) and leave for six or so hours. When you go back to it, it should be very bubbly and excited. Scoop out about 1/4 of a cup of starter into a sterilised jar, feed with a tablespoon of flour and a little water, stir and put somewhere safe for a few hours while you get your bread ready.
 |
| Bubbling sponge, ready to go. |
2. Mixing the dough
I'm about to share with you my own recipe for multigrain sourdough. Now, keep in mind this is an ever-changing recipe, as I make new additions and alterations to it, on my quest for sourdough perfection. This means, it is by no means perfect, but it is pretty darn good, I think. I usually use a combination of whatever seeds and grains I have in my pantry at the time - this loaf was quinoa, sesame, sunflower, chia, flax and pearl barley. The types of seeds and grains will vary the loaf slightly, but I'm not too worried about a bit of mild variation. Feel free to use a consistent recipe if you prefer.
Multigrain Sourdough
250 grams white flour
250 grams wholemeal flour
2 tsp salt
2 Tbsp olive oil
1 tsp brown sugar or honey
1 cup mixed seeds and grains
1 Tbsp fennel seeds (optional)
Water
Add all ingredients to the large bowl containing your starter and mix to combine. Slowly add in water, 1/2 cup by 1/2 cup, and mix as you go. The amount of water varies each time depending on the quantities of seeds and grains and the types of flours. I think I used about 1 1/2 cups for this loaf. You are aiming for a soft, slightly sticky dough. Once you think you have enough water added, turn the dough out onto a well-floured surface and begin to kneed. Turn and kneed the dough for 5-10 minutes until it is smooth and elastic. Place in a greased bowl and cover with gladwrap.
 |
| Ingredients, added to sponge. |
 |
| Mixed to a soft dough. |
 |
| After kneeding, ready to rise. |
Once you've finished mixing your dough, pop the lid on tight on your jar of starter and keep it in the fridge until next week. Like I said above, I find a once weekly loaf works quite well for me, but if you can't manage that, be sure to feed your starter a spoon of flour and a bit of water instead. They are hungry beasts!
3. Rising the dough
Sourdough takes longer to rise than regular dough, and I find the longer I rise it, the more sour it becomes. I usually make my sponge in the morning, mix and need my dough in the evening, and then bake my bread the next morning. You will need to find a routine that works for you.
Place the covered bowl in a warm place (back to the old hotwater cupboard again) and leave for 6-10 hours to rise. The dough should have doubled in size and spring back when you poke it.
4. Shaping and baking the dough
Preheat your oven to 200 degrees Celsius. Turn out your risen dough onto a floured surface and gently shape into a loaf. I prefer a classic cob style with a few deep slashes on top, although I have made this recipe in loaf tins before too. You want to treat your bread gently here as you don't want to knead out all of it's rising efforts. I usually just shape mine, and place it straight on the oven tray. Then, I cut a few deep clashes in the top, spritz it with water (that helps make a thick crust) and sprinkle it in flour or a few more seeds. Place in a hot oven for 30-45 minutes, or until golden brown on top and hollow when you taps it's bum. Again, I find my baking times vary and I'm not sure how reliable my ancient oven is, so I would keep an eye on it. I would always err on the side of over-cooked with this loaf, as it's quite dense and you don't want it to be doughy in the middle.
 |
| I forgot to take a photo!! Here is a white sourdough loaf I made last year instead... |
And that's it! Sourdough 101! I hope you have enjoyed my perspective on this mysterious creature, and give it a go yourself. It's rather satisfying to make bread using your very own yeast, and I quite like the idea of having one to match my house. Happy baking!
Part one here.
Part two here.
Part three here.

No comments:
Post a Comment