Saturday, April 14, 2012

Vietnamese Chicken Salad

This is not so much of a recipe as it is a 'here are some things to put in a bowl together'. Paddy and I have been craving Vietnamese food since we went to a delicious, cheap and cheerful restaurant for tea a few weeks ago, and a lovely friend of mine has just gotten back from Vietnam. So jealous!

The beautiful bowl is from my mother-in-law. Isn't it gorgeous!

I soaked some dried mushrooms for a dish last weekend and my friend suggested keeping the soaking water to make soup out of. I decided to try it as the poaching liquid for the chicken for this salad instead. I threw in a cinnamon stick, some star anise, ginger root and galangal, and it worked a treat! You could definitely mix and match the ingredients to suit what is in your fridge, but the dressing is a must have!

Vietnamese Chicken Salad
- 2 organic chicken thighs, poached in stock or water with star anise, cinnamon and ginger and shreaded when cool
- curly kale (in leiu of red cabbage, which I had run out of)
- diced carrot
- diced cucumber
- diced red capsicum
- fresh corn, cut off the cob
- 1 finely diced medium red chilli
- a generous handful of cripsy noodles
- fresh coriander to taste
- fresh mint (I used Vietnamese mint) to taste

Dressing
- 1 Tbsp fish sauce
- 2 Tbsp sugar
- 1 Tbsp each lime and lemon juice
- 1 Tbsp sweet chilli sauce

Mix sauce ingredients together and set aside. Place all ingredients except crispy noodles in a bowl, dress generously and toss. Add the noodles just before serving. Enjoy!

Thursday, April 12, 2012

Sourdough 101 - Bake your Bread!

Oh hello there.. opps I may have been a bit slack in finishing this series off, sorry... We have had family to stay for the weekend and I have been busy doing deliciously fun things like picnicking, enjoying the sun, supporting pursuits towards my vege gardens being built, eating, eating and more eating. Back to work on Tuesday though, and back to reality.

Anywho, back to the sourdough, Hopefully your starter has been bubbling away and you have been feeding it regularity to keep it alive. I usually leave mine in the fridge during the week and bring it out in the weekend for making by weekly batch of bread. This system seems to work well for me, and I am yet to kill a starter.

Making a lough of bread has a few different steps: making the sponge, mixing the dough, rising the dough, and shaping and baking the dough. Let's start at the beginning:

1. Make the sponge
Before you make a loaf, you need to get your yeasts/starter in optimum condition - this is called the sponge. To make this, I tip my starter into a big ceramic bowl, mix in 100 grams of flour and enough tepid water to make a thick batter, cover with gladwrap, pop in a warm place (e.g hotwater cupboard) and leave for six or so hours. When you go back to it, it should be very bubbly and excited. Scoop out about 1/4 of a cup of starter into a sterilised jar, feed with a tablespoon of flour and a little water, stir and put somewhere safe for a few hours while you get your bread ready.
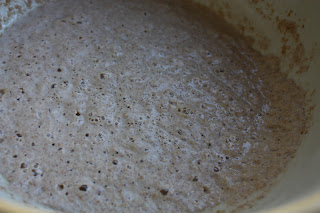
Bubbling sponge, ready to go.

2. Mixing the dough
I'm about to share with you my own recipe for multigrain sourdough. Now, keep in mind this is an ever-changing recipe, as I make new additions and alterations to it, on my quest for sourdough perfection. This means, it is by no means perfect, but it is pretty darn good, I think. I usually use a combination of whatever seeds and grains I have in my pantry at the time - this loaf was quinoa, sesame, sunflower, chia, flax and pearl barley. The types of seeds and grains will vary the loaf slightly, but I'm not too worried about a bit of mild variation. Feel free to use a consistent recipe if you prefer.

Multigrain Sourdough
250 grams white flour
250 grams wholemeal flour
2 tsp salt
2 Tbsp olive oil
1 tsp brown sugar or honey
1 cup mixed seeds and grains
1 Tbsp fennel seeds (optional)
Water

Add all ingredients to the large bowl containing your starter and mix to combine. Slowly add in water, 1/2 cup by 1/2 cup, and mix as you go. The amount of water varies each time depending on the quantities of seeds and grains and the types of flours. I think I used about 1 1/2 cups for this loaf. You are aiming for a soft, slightly sticky dough. Once you think you have enough water added, turn the dough out onto a well-floured surface and begin to kneed. Turn and kneed the dough for 5-10 minutes until it is smooth and elastic. Place in a greased bowl and cover with gladwrap.

Ingredients, added to sponge.

Mixed to a soft dough.

After kneeding, ready to rise.

Once you've finished mixing your dough, pop the lid on tight on your jar of starter and keep it in the fridge until next week. Like I said above, I find a once weekly loaf works quite well for me, but if you can't manage that, be sure to feed your starter a spoon of flour and a bit of water instead. They are hungry beasts!

3. Rising the dough
Sourdough takes longer to rise than regular dough, and I find the longer I rise it, the more sour it becomes. I usually make my sponge in the morning, mix and need my dough in the evening, and then bake my bread the next morning. You will need to find a routine that works for you.

Place the covered bowl in a warm place (back to the old hotwater cupboard again) and leave for 6-10 hours to rise. The dough should have doubled in size and spring back when you poke it.


4. Shaping and baking the dough
Preheat your oven to 200 degrees Celsius. Turn out your risen dough onto a floured surface and gently shape into a loaf. I prefer a classic cob style with a few deep slashes on top, although I have made this recipe in loaf tins before too. You want to treat your bread gently here as you don't want to knead out all of it's rising efforts. I usually just shape mine, and place it straight on the oven tray. Then, I cut a few deep clashes in the top, spritz it with water (that helps make a thick crust) and sprinkle it in flour or a few more seeds. Place in a hot oven for 30-45 minutes, or until golden brown on top and hollow when you taps it's bum. Again, I find my baking times vary and I'm not sure how reliable my ancient oven is, so I would keep an eye on it. I would always err on the side of over-cooked with this loaf, as it's quite dense and you don't want it to be doughy in the middle.

I forgot to take a photo!! Here is a white sourdough loaf I made last year instead...

And that's it! Sourdough 101! I hope you have enjoyed my perspective on this mysterious creature, and give it a go yourself. It's rather satisfying to make bread using your very own yeast, and I quite like the idea of having one to match my house. Happy baking!

Part one here.
Part two here.
Part three here.

Monday, April 2, 2012

From My Kitchen - Sunday 1st April

Last week of term = busy Amy! We also have family coming to stay for the weekend; the house needs a clean and the tins are empty, so it will be an even busier week than usual! I also need to make at least one batch of hot, hot buns! I usually do one batch a year, on Easter Sunday (I never bother with the cross, hence the name). I use a lovely recipe from River Cottage that includes crystalised ginger. Yum! Hunt it down and have a try if you are looking for a new recipe this year.
Here we go:

Dinner
Sunday - hunza pie with green salad
Monday - coconut cream mushroom cabonara
Tuesday - off to a Tupperware party so a big bowl of kale salad prior to will do me fine
Wednesday - pumpkin and millet cakes with jewel salad (a version of these but with pumpkin instead...)
Thursday - zucchini fritters with homemade chorizo crumbs and green salad

To Make
- weekly batch of muesli
- weekly batch of sourdough (Recipe coming soon. Have you made your starter yet?)
- zucchini chocolate cake (to help use up all the zucchini I have in the fridge!)

Sourdough 101 - Day 3 - 7

Day 1 here
Day 2 here

By now you should have a bubbling bowl of fermenting loveliness and be ready for the next stage - feed and discard. Our yeasty baby needs feeding to keep growing, but we also need to get rid of some of the starter or we will end up with a room full.
The steps we need to follow each day for the next five or so days are this:
  • scoop out and discard about half of your starter
  • stir in another 100 grams of flour and enough water to keep it at a thick batter consistency
  • cover again with glad wrap and put to bed for another 24 hours - it can now live in a draft-free place, at room temperature (maybe on your kitchen bench, out of the sun)
Each day it should get more and more bubbly and start smelling quite yeasty, fruity and sweet.Once it is bubbling away happily and is smelling like a bowl of fermented goodness, we will bake bread!

See the bubbles? That's what we are aiming for!

Part one here.
Part two here.
Part four here.

Sunday, April 1, 2012

Sourdough 101 - Day 2

If you didn't catch Day 1 - start here!

So, overnight your wee yeasty baby has hopefully been growing and multiplying and beginning to ferment. Have a close look this morning at your starter and see if there is any sign of bubbles. If not, give it a stir and pop it back into it's warm hide-away for a bit longer. If it is - great! Now we begin to feed...

For the next few days we are going to be adding flour and water and discarding a bit of the starter until we are happy with the final product and ready to make our first loaf of bread.
Today you need to:
  • whisk in 100 grams more of flour and enough water to keep the consistency the same as yesterday
  • cover again with gladwrap and put it back to bed
  • check again in about six hours and give it another stir, then leave it be until tomorrow morning
Add flour and water to your bubbling starter
Part one here.
Part three here.
Part four here.


Saturday, March 31, 2012

Sourdough 101 - Day 1

I've been keeping a sourdough starter for a few years now. It's quite fun - like a little bacteria baby (but the good kind!) that makes delicious bread. I am not as adventurous as some with my starter - those who make crumpets, pancakes, muffins and pretty much everything flour-based with their starters impress me to no end! I am just your standard, one loaf per week gal. So, this is definitely sourdough for beginners! If you want screeds of information and fangdangled recipes, google it, and you will no doubt find plenty to keep you busy!

I made a new starter when I moved into my new house, partly because my old one died, but partly because I like the idea of having house-specific yeasts for my bread making. Yes, I am a little weird like that! I loosely used the process from River Cottage to make my starter. It is quite a lengthy process - give yourself at least a week before you actually get to make a loaf - but I am going to try and break it down day-by-day for you.

To make a starter you will need:
  • a big, ceramic bowl (not stainless steel or plastic)
  • at least 1kg of good quality flour - I use organic wholemeal, but I've heard rye is the best
  • an organic grape (optional, but helps the yeast get going)
  • a warm place

Here's what you do:
  • measure 100 grams of flour and mix well with warm water to the consistency of a thickish batter
  • once mixed, drop a single organic grape in the middle of the mixture
  • cover with gladwrap and leave in a warm, draft-free place (hot water cupboards are ideal)
  • wait

Your mixture should look something like this

Starters take all different amounts of time to get going - mine took a good day or so, but some can be bubbling away within a matter of hours. I would do the above process at night and then check it in the morning to see if it needs a feed.

Tomorrow we will discuss feeding our starter to get it really going!

Please note: it will take about 7-10 days before you are ready to start making bread.

Part two here.
Part three here.
Part four here.

Tuesday, March 27, 2012

From My Kitchen - Sunday 25th March

Due to sickness and other events such as friends visiting etc, last week was a right off meal planning wise! However, I am back this week with a fridge full of delicious veges and a plan. A bit late maybe, but you know, life happens! I've got a yummy salad recipe this week, to help make a dent in that cabbage we all have lurking in the back of the fridge; and the first part of making your very own sourdough starter; so stay tuned!

Dinner
Sunday - slow-cooked Asian style pork shoulder with jewel salad and roast potatoes, with quince crumble for dessert!
Monday - leftover pork made into rice paper spring rolls with carrot, capsicum, zucchini, coriander and soy chilli dipping sauce
Tuesday - last cooking class of the term, this week it's lamb vindaloo with Bombay potatoes
Wednesday - feta, spinach and roast pumpkin cannelloni with green beans
Thursday - homemade pasta with roasted tomato sauce

To Do
- make sourdough
- make muesli