Pages

Tuesday, January 25, 2011

The First Peach

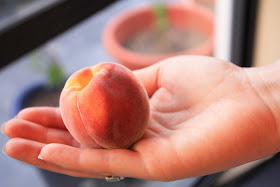
I grew peaches! In Christchurch! And they taste amazing!

 So very proud of myself right now. Oh, and my wee tree. Didn't she do well! 


 I can't wait for the other eight to be ready! Not sure what the praying manti are going to do once we have eaten them all though, they have been having regular meetings on the peaches almost everyday...

Monday, January 24, 2011

Apricot Honey AKA Summer in a Jar!

It is the middle of summer in New Zealand at the moment (although the weather may beg to differ), which means access to an abundance of incredible, fresh, local produce. While I am doing my bit to eat my fill of this selection, some certainly needs to be preserved for the long winter months. I picked up this recipe for Apricot Honey, when I visited a friends' family apricot orchard. We picked until our hearts and tummies were content, and I ended up with a supply of delicious fruit, as well as this amazing recipe. I only wish I could remember the name of the orchard so I could credit them with it!

Apricot Honey
12-15 fresh apricots, stones removed
3 cups dried apricots, soaked overnight in water
2 cups sugar
Juice of 2 lemons
100 grams butter
3 eggs, beaten

Place soaked, dried and fresh apricots in a pot and cover with water. Boil until tender and puree until smooth. Combine puree with sugar, lemon juice and butter and stir until the sugar dissolves. Add the beaten eggs and cook, stirring continuously until the mixture thickens. Bottle in sterilised jars and seal. Keep refrigerated.
Makes about 6 jars.

This mixture is utterly divine and tastes like summer in a jar. I will have to be sure not to eat it all now, so I will have some for winter! This honey is delicious on toast with butter, dolloped on yoghurt, in smoothies, and something I haven't tried yet but am sure would be amazing - folded into homemade ice cream!

Apricot honey on vanilla-poached rhubarb with yoghurt and cream!

Sunday, January 23, 2011

From My Kitchen - Sunday 23rd January

Having started my first 'grown-up' job in the past few weeks, I am having to make a lot of adjustments. Six years of Uni has not prepared me for how tired I currently feel at the end of the day (not helped by a 1 hour commute each way), and getting home later in the evenings means I need to be even more organised than I usually am, to get dinner on the table at a reasonable time!

Also, as my job also includes a lot of traveling, keep an eye out for a future post on eating well on-the-road!

Baking
- loaf bread
- wholemeal rolls for the freezer
(Still lots in the freezer and I am eating lots of fresh fruit for snacks instead at the moment!)

Dinner
Sunday - mushroom and thyme risotto with sauteed green beans
Monday - wild venison steaks, potato salad and BBQed, lemon-marinated zucchini
Tuesday - free-range pork chops, pumpkin and kale salad and corn-on-the-cob
Wednesday - caramelised onion, bacon and mushroom tart with garden salad
Thursday - roast pumpkin and tomato lasagna with garden salad

To Do
- marinate zucchini
- make lasagna filling
- make tart filling

Friday, January 21, 2011

Vintage Love

I can't get enough of vintage, it is my greatest love...

Source

To fulfill my vintage needs I have been doing a bit of online shopping lately, on two gorgeous, vintage clothing sites in particuar. I highly recommend you check them both out! Two new dresses arrived today, and it was major excitement at the letterbox. I can't wait for the weather to perk up so I can wear them!!

Source
Here are the links, you simply MUST look at them!


House of Maryanne Vintage

Vintage Marketplace

Source
Any other good vintage sites I should know about? Please do tell!

Thursday, January 20, 2011

'Modified' Caeser Salad

No recipe this time, just another meal show-off, on account of it being so delicious!

'Modified' Caeser salad with: chicken, free-range bacon, croutons, cos lettuce, green beans, red onion, red capsicum, capers and homemade mayonnaise, topped with an organic, free-range poached egg. Very yum indeed.


Currently brewing a large pot of this amazing tomato sauce, and about to watch 'Exit Through the Giftshop'. Much excitement!

Wednesday, January 19, 2011

Zucchini and Mint Fritters


Anyone who grows zucchini/courgettes know that invariable, you end up with an excess. And on occassion, one gets away on you and all of a sudden you have a marrow! As I have hit this point in the growing season, I have been trying to come up with creative ways to use up the excess. Tonight for dinner, it was quick and easy zucchini and mint fritters, served with garden salad, sauerkraut and homemade tomato relish. Perfect for a 33 degree evening!


Zucchini and Mint Fritters
4-5 zucchinis or 2 medium sized marrows (about 3 cups when grated)
3 Tbsp chopped mint
3/4 cup flour
2 eggs
1/2 cup grated cheese
Salt and pepper to taste

Grate the zucchini and squeeze the excess liquid from it. Add to a bowl with all the remaining ingredients and mix until combined. Fry large spoonfuls of batter in a few tablespoons of olive oil, until golden brown on each side. Keep fritters warm until all mixture has been cooked. Serve warm or cold with salad and relish.


Monday, January 17, 2011

Handmade Pasta and To-Die-For Tomato Sauce

If you have never tried making pasta at home, you are seriously missing out on some fun times and extraordinarily delicious food. I am lucky enough to have a pasta maker, but if you don't it would still be possible, with a bit more work. Surely that would make it taste even better though?!

Most pasta recipes are very similar. Here is the one I use, which came from my little brother, who happens to be a chef (a very handy profession to have in the family!).

Pasta Dough 
2 eggs, lightly beaten
1 Tbsp extra virgin olive oil
2 cups white flour (I've had success with half white, half wholemeal too)
1 Tbsp water
A pinch of salt

Combine the eggs, oil and water. Add the flour and salt, mix until combined and then knead to a smooth, elastic dough. Add more water if the dough is too dry. Wrap in Gladwrap and rest in the fridge for at least an hour, or up to a day. I find the dough best (easier to use) after 6 or so hours in the fridge.

Roll the dough into flat sheets; I use number six on the pasta maker, but this is personal preference. Then, cut free hand or use the pasta machine to cut into spaghetti or fettuccine. To cook, bring a large pot of water to a rolling boil, with a splash of olive oil and a pinch of salt added. Add pasta (do in batches if you have a lot) and cook for only a few minutes - keep watch, it's very quick, and you don't want to overcook it! Pour cooked pasta into a colander to strain the hot water off quickly, and it's ready to go! If you are making your own pasta sauce, chef's always save a bit of the pasta water to add to the pasta sauce just before serving; about two tablespoons is plenty. The starch in the water helps to thicken the sauce. This recipe makes enough for about four people, but it all depends in how hungry you are. Sometimes Paddy and I can eat an entire batch between us!

Rolling dough into flat pieces. Paddy is an excellent hand model.

Now, into fettuccine...

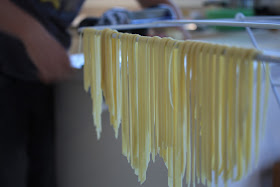
Pasta on the clothes rack, ready to use.
Now, for the to-die-for tomato sauce. This a modification to a recipe that has been floating around in the blog world for a while. I decided to give it a try with fresh tomatoes (the original uses tinned), and it was utterly amazing.

To-Die-For Tomato Sauce
1 kg fresh, in-season tomatoes
50 grams butter
1/2 an onion, peeled but not chopped
Salt

First, peel the tomatoes. Then, cut out the hard core and dice them roughly. Place tomatoes and onion into a pot with a sprinkle of salt, to help draw out the moisture. Boil for 10 minutes. Then, add the butter and boil gently for a further 30 mins, with the lid off, so the sauce thickens and reduces. Discard the onion. Add a tablespoon of pasta water at the end, if you saved it, and stir to combine. Toss over warm pasta and devour.  It's that easy! Serves two hungry people.

This was so incredible delicious, I am going to make a large batch to freeze, for a taste of Summer during those dark Winter months that are approaching!

Served with fresh basil and a homemade wholegrain roll. Oh, and a few glasses of red wine...

Sunday, January 16, 2011

From My Kitchen - Sunday 16th January

My meal planning has gone a bit astray over the holiday season, as we have been in and out and never quite sure where we will be for many evenings. However, I am back to work tomorrow, so some sense of routine will return to our lives, and hence, meal planning returns. The garden is abundant with produce at the moment, and I am thoroughly enjoying shopping just a few steps from my kitchen!

Baking
- none to do this week, still working on freezer stocks and lots of fresh fruit!

Dinner
Sunday - zucchini and mint fritters with homemade tomato relish, garden salad and homemade sauerkraut.
Monday - homemade pasta and to-die-for tomato sauce with kohlrabi and apple coleslaw.
Tuesday - chicken, avocado, carrot and mayo sushi, with miso and mushroom soup.
Wednesday - free-range pork and vege stirfry (kale, carrot, broccoli, kohlrabi, mushroom, capsicum, seeds and red onion) with noodles.
Thursday - Caesar salad: lettuce, croutons, bacon and homemade mayo, with grilled zucchini.

To Do
- make pasta dough
- soak sushi rice
- make mayonnaise

Friday, January 14, 2011

Grapefruit and Tangelo Marmalade

A visit to Paddy's family homestead in the apptly-named Bay of Plenty for Christmas meant a supply of excess citrus fruit. I hate to see good produce go to waste, but there was far too much for the lucky owner of the trees to keep up with. Faced with such a huge bounty, I thought it was about time I had a go at making marmalade. Here is my recipe, adapted from a number of different books I consulted before setting out. This is a double recipe and makes about 4 delicious litres of marmalade. That equates to a lot of jars... It seems like an insane amount of sugar, but I did my calculations (from pounds to kilos) several times, and this is what I kept coming up with. Someone once told me to never alter the amount of suger in jam/marmalade or the amount of vinegar in chuntey, as it is the preserving agent, so I just went with it, and added all 9 kgs!
Recipe can be halved if desired.


Grapefruit and Tangelo Marmalade
10 tangelos
6 grapefruit
9 kgs of sugar
20 cups of water
Juice and zest of 4 lemons

Finely slice the grapefruit and tangelos. The size of the slices effects the final product, so take your time and do this properly or you will regret it! Cover the chopped fruit with the water and leave to soak overnight. 
The next day, bring the fruit and water to the boil and cook for about an hour, or until the fruit is soft. Then, add the sugar and boil until set (around 40 minutes). To tell if marmalade is set, freeze a saucer, place a dollop of marmalade on the saucer, leave it to cool amd run your finger through the middle of the dollop. If it stays parted, the marmalade is set. Bottle marmalade into sterilised jars and seal. Store in a cool, dark place and refrigerate when opened.

For a first atempt, I think this turned out pretty darm delicious. Admittedly, the produce I had to work with was AMAZING (many grapefruits were also consumed in their raw state), but I am going to take at least a little credit for the result!

Collecting grapefruit from the laden trees


The fruit, soaking overnight in water
The finished product. Excuse the dreary photo, it's a rainy day here!

On homemade wholemeal bread for breakfast this morning. Yum!!

Thursday, January 13, 2011

Homemade Stock

I try my best to use every last bit of everything that enters my house. Fabric gets tucked away for future projects, wrapping paper gets labouriously rescued to wrap once again, scrap paper becomes note pads, green trimmings become rabbit food, excess produce becomes marmalade, chutney or dinner, and meat bones become stock. Stock is healthy and simple to make, and something I believe everyone should get in the habit of doing. Read the back of your Maggi stock next time you are mixing some up for soup or risotto, as ask yourself if you really want all of those chemicals going into your body. Trust me, you don't; especially not when there is an alternative.  This basic process can be altered to suit your needs. Stock can be made with any bones, or, completely vegetarian. I like to add a lot of herbs to mine, as I find it makes the end flavour richer, but again, this can be altered to suit your tastes.

If I don't have time to make stock when we have eaten chicken, I will freeze the carcass whole, along with some carrots and celery, so it is pretty much all ready to go in a pot when I have a bit of spare time.


Basic Chicken Stock
1 chicken carcass, leftover from the roast
A few carrots (if fresh, leave the tops on)
An onion, peeled and halved
A few stalks of celery, leaves included
Herbs and spices of your choice- I use any herbs I currently have in the garden, usually a combo of rosemary, parsley, lemonbalm, mint, sage, thyme and oregano, a bay leaf, and a few peppercorns
Water to cover

Boil all ingredients for an hour or so. Stock can also be made in a crockpot, which is even easier! Strain and discard bones and vegetables, pour stock into pottles to store. I freeze mine in 1 litre lots, which is the perfect amount for homemade risotto or soup.

Ingredients, before boiling

After boiling for an hour

And, stock becomes soup!
For the batch I photographed for this post, Paddy also added a few leftover roast veges, leftover gravy, some cabbage, wrinkly ginger that had been in the fridge too long and a handful of goji berries, as this stock was destined to become healing broth. It made the most rich and delicious broth we had ever had, and Paddy and I are kicking ourselves for not writing down the exact recipe!

Tuesday, January 11, 2011

Cherry Bounty

We have a 5 year-old cherry tree of unknown variety (although I hypothesise it's a Stella) in our teeny tiny garden. It has the potential to be a full-sized tree, but is planted in a root-restricting bag, in a wine barrel. This, in theory, means it will stay small, but time will tell...
This year we harvested 1.3 glorious kilos of cherries, ready, as always, on Christmas Day. I have been a bit remiss with this post, as we flew up north to see family on Christmas Day, but now seems like a good a time as any to show off the harvest! It's safe to say these cherries were eaten on the plane, and, all gone by lunchtime! Now we sit and wait patiently for next year...

Monday, January 10, 2011

Pay It Forward: 2011

I promise something handmade to the FIRST 5 people who leave a comment here. However, to be eligible, you must repost this message, offering something handmade to 5 other people. The rules are that it must be handmade by you, and it must be sent to your 5 giftees sometime in 2011. Ready, set, GO!

Found this lovely idea over at With My Own Two Hands. How exciting! Snail mail is SUCH fun... :)

Image source

Homemade Bagels

I was never a fan of bagels until I had a go at making them myself. Homemade bagels are nothing like the stale frisbees that are sold in most supermarkets. They are dense, chewy and utterly delicious, fresh from the oven, or toasted, a few days later. They keep better than most homemade bread, and very rarely make it into the freezer at our house, as they all get eaten before I have a chance!

I use the bread maker to make the dough, and then shape, boil and bake by hand. Despite all the steps, bagels aren't actually that time consuming, and the reward of eating them fresh out of the oven is worth any effort!

This is the recipe for basic, white bagels but they can be made wholemeal or even rye, with a few variations to the basic recipe.

Basic White Bagels
1 1/8 cups water
1 Tbsp olive oil
2 Tbsp sugar
1 tsp salt
3 1/3 cups white flour
2 tsp yeast

Combine all ingredients in bread maker and set to dough.
Once dough is made, there are three key steps:
1. Shape your bagels
There are many methods to do this, and probably lots of tutorials on the internet to show you how. I am not fancy, or fussy that mine turn out perfect, so I will share my easy method. First, I cut the dough into 8-12 pieces (depending on how big you want your bagels to be). Then, I roll the dough into a fat patty, making sure at least one side is smooth (the other side goes on the tray so it doesn't matter if it is a bit rough looking). To make the hole, I poke my finger through the middle of the 'good' side, then slowly twist the bagel around, shaping the hole until it is as big as desired and smooth. This creates a bagel with no seam. Cover with a tea towel and rise the shaped bagels until they double in size.


2. Boil your bagels
Bagels get their delicious, dense texture by boiling them before cooking. To do this, bring a large pot of water to the boil, and turn your oven on to preheat to 200 degrees celcious. Once the water is at a rolling boil, gently lower bagels in, a few at a time, with the 'good' side down to the water. Boil for about a minute, then gently flip the bagel over and boil the other side. Gently place the boiled bagels on a greased oven tray and keep going until they are all boiled.


3. Glaze and cook your bagels
Bagels can be glazed with all types of toppings, but I tend to use milk or an egg yolk. I also scatter some sesame, poppy or pumpkin seeds on top before cooking, but they are just as good plain. Bake bagels in your preheated oven until the are golden; around 20-25 minutes.


Everyone has their favourite toppings for bagels; mine is homemade cream cheese - keep an eye out for that easy recipe this week! However, today we had them for breakfast, decadently, with bacon, fried portobello mushrooms, poached eggs and hollandaise. Yummy!

Saturday, January 1, 2011

Happy New Year!

Just a quick note to say Happy New Year to all those people out there, who take the time to stop by and read my little blog. I hope you all had a Christmas full of delicious food, spent with people you love, and a safe and happy New Years.

Last night we christened our new pizza oven, lovingly built for me by Paddy, by having a party for any and all of our very special friends. It was a wonderful night, ending with fireworks and the most amazing bottle of mead! I am now indulgently sitting on the couch, still in my dressing gown (!), eating leftover dessert from last night (dessert pizza, chocolate pav with cream and berries, and extra cream and berries) and watching my all-time favourite programme, River Cottage. Sheer bliss!

Have a happy day everyone. Much love xxx